

Joining the Server:
Server IP Address: MineTrek.net
Project Forum: MineTrek Forums (Forums.MineTrek.net)
Official Blog: MineTrek 2.0 (minetrek2.blogspot.com)
IRC Channel: Server - irc.esper.net Channel - #MineTrek
Teamspeak 3 Server Address (For Client): MineTrek.net
C3 Channel: MineTrek2.0
Online Dynmap View: MineTrek Server Dynmap (Dynmap.MineTrek.net)
Server Rules: https://tinyurl.com/y8tu9lak
Notes on Joining:
- MineTrek Discord Channel Invite: https://discord.gg/yVykGQc
- You can only join the server with a legitimate copy of Minecraft.
- The ship will look ridiculous without one of the texture packs. Many custom textures are used to bring the standard Minecraft blocks into the 24th Century.
- --Before getting started make sure you are running the latest version of Java for your computing platform: http://www.oracle.com/technetwork/java/ ... index.html
- --Also I recommend Installing the latest Java JDK and using that in your client settings for the executable.
MineTrek 1.12.2 Modserv (All / Required Mods for Installation):
- MineTrek Modpack Full -- A Single File with everything required to mod your client to access the MineTrek Modded Server System including instructions.
- --When unzipped place the "files" inside the unzipped folders into your mods folder in your client.
- --Lastly, you'll want to enable java parameters on your client and paste the following code into that box for optimal performance, Make sure to customize the parameters to your own machine as desired,
Client Java Parameter Code: Try what seems best for your particular system and modify the RAM and CPU Thread counts in the parameters to tweak your systems performance.
{{Note: Feel free to adjust the parameters below ((-XX:InitialHeapSize=8G, -XX:MaxHeapSize=8G and -XX:ParallelGCThreads=4)) to reflect both your custom RAM allocation for the first two and the number of CPU threads/cores you would like to allocate to the MineCraft Client for the third one as personally desired and appropriate for your own computer system.}}
--Default Java Parameters for Those So Inclined:
-Xmx4G -XX:+UnlockExperimentalVMOptions -XX:+UseG1GC -XX:G1NewSizePercent=20 -XX:G1ReservePercent=20 -XX:MaxGCPauseMillis=50 -XX:G1HeapRegionSize=32M -Dlog4j2.formatMsgNoLookups=true
--Enhanced Java Parameters for Computers with more available RAM and a greater number of CPU Cores:
-XX:+UnlockExperimentalVMOptions -XX:InitialHeapSize=8G -XX:MaxHeapSize=8G -XX:+UseG1GC -XX:MaxGCPauseMillis=50 -XX:ParallelGCThreads=4 -XX:+DisableExplicitGC -XX:+AlwaysPreTouch -XX:+ParallelRefProcEnabled -XX:+UseStringDeduplication -Dlog4j2.formatMsgNoLookups=true -XX:+PerfDisableSharedMem
The "Work" outlined in the above Creative Commons Attribution applies fully to the MineTrek Mod and MineTrek Resource Pack.
Attribution-NonCommercial-ShareAlike 4.0 International (CC BY-NC-SA 4.0) -Simplified
Attribution-NonCommercial-ShareAlike 4.0 International (CC BY-NC-SA 4.0) -Complete
Resource Pack(s):
- Official Server 64x Resource Pack v11 Additions by BurntBiscuits, DeathMonkey, huansolo, Bluegobln, iPANIC14/iPanic, Atrocities, mheller3000, Bluephobes, Honkalonka, ChrisRyot and ShadowApler77. Please Note: This pack and all future packs are compatible with Minecraft v1.9.x onwards. They are not inherently backwards compatible with v1.8.x backwards.
MineTrek 1.12.2 Modserv (Required Mods for Installation):
- First off you need to install Forge here: Latest Version-----Forge-1.12.2-14.23.5.2860
- Forge
- Then drop all of these mods into your Mod folder,
- Liteloader
- CreativeCore
- Chisels & Bits
- REMOVED----------Extra Bit Manipulation
- LittleTiles
- REMOVED----------A Little Extra Tiles
- LittleTiles 3D Importer
- Flat Colored Blocks
- REMOVED----------Flat Colored Blocks Hex Code Searcher
- MineTrekMod

The "Work" outlined in the above Creative Commons Attribution applies fully to the MineTrek Mod and MineTrek Resource Pack.
Attribution-NonCommercial-ShareAlike 4.0 International (CC BY-NC-SA 4.0) -Simplified
Attribution-NonCommercial-ShareAlike 4.0 International (CC BY-NC-SA 4.0) -Complete
MineTrek Server/Project and Community Site Links:
Scroll Down further for Wiki info and Server connection and Resource Pack(Texture Pack) info.
|
MineTrek's tumblr Page:
http://minetrekofficial.tumblr.com/ |
|
Atrocities's Youtube Channel:
https://www.youtube.com/user/LordAtrocities/videos MineTrek's New Donations Page.
Please Donate to help support the continued operation of the MineTrek Server and Project: Donate.MineTrek.net |
The MineTrek Server Project and Community:
We build highly detailed Star Trek Starships in Minecraft all at 1:1 Scale or larger. Starfleet ships mostly, but we also have alien ships and other sci-fi shows ships.
Here are some websites owned by the MineTrek Community at large for further information:
forums.minetrek.net - The Minetrek community forums were we post the majority of our progress reports past, present and future.
This is also the site to go to to apply to become a cadet and learn how to build and eventually if you pass become a builder and contribute and become a full member of the MineTrek Community.
wiki.minetrek.net - The Minetrek Community wiki site, contains our latest up to date Resource pack and details on ranks and the most prominent videos made through the years about the community and server.
fb.minetrek.net - Our MineTrek community facebook page. If you like what we do let us know by liking us and following our progress.
dynmap.minetrek.net - A full dynmap view of the entire server for reference and navigation purposes.
We are not white-listed so feel free to come in and look around and enjoy the amazing creations of the last 4 years of the MineTrek Community.
Happy MineTrekking,
-mheller3000
Below This is the Wiki page for the MineTrek Shipyards - the Enterprise-D Minecraft Project server.
Server Details:
Server Administrator: mheller3000
Forum Administrators: mheller3000
Active Server Moderators: mheller3000, Atrocities, madsquirrel19, Debomb72, Huansolo, Linuxgnuru, Bluephobes
Recommended Client Mods:
Server Administrator: mheller3000
Forum Administrators: mheller3000
Active Server Moderators: mheller3000, Atrocities, madsquirrel19, Debomb72, Huansolo, Linuxgnuru, Bluephobes
Recommended Client Mods:
- Optifine - This mod helps to optimize the graphics on your client and can lead to a large increase in FPS if used correctly, greatly helps in improving your minetrek gaming experience.
- Single Player Commands - This mod is required in order to fully take advantage of the Worldedit and Safeedit plugins in the server when building. (No longer required, only available for Single Player Worlds)
- WECUI - This helps greatly in using the Worldedit and Safeedit systems in server by creating graphical selection boxes when editing large and small areas. Highly Recommended.
- Gammabright - Highly recommended to fully light the world and rooms like the classic minecraft environment. Allows for building without having to place light sources ever.
- EllianDetector/Zan's Minimap/VoxelMap - Great for finding your place in the local world map and for cavemapping to see the deck layouts for building and general navigation needs.
- Too Many Items or Not Enough Items - Highly Recommended for easier management and searching of all blocks and items in the inventory.
- Macro Keybind - Great for setting up macros for repetitive we commands, speed commands and other essential commands with a single key click.
- Tabby Chat - Great for organizing and restricting certain kinds of chat traffic in game.
- QuickHotbar - Recommended for quick access to your entire hot bar contents from inventory.
- BetterFoliage - Makes tree trunks, which we use as cabling and piping, round instead of square. Very nice visual look.
Server Rules:
A note on 'Personal' Quarters: while it is nice to have a "home base" on such a large ship to retreat to after a hard day's building, the quarters you have created are not strictly yours. Any builder may edit them if they believe major improvements can be made, just as they may in any area. Additionally, personal touches to quarters must reflect the style seen within the show. For example, do not put into 'your' quarters: Borg Alcoves, dense foliage, engineering equipment, mini Holodecks, swimming pools, etc. Use your common sense and the knowledge you gleaned from watching the show when it comes to decorating quarters. Any quarters deviating from this rule will be cleared by a senior staff member upon discovery.
- Respect all players. No gratuitous swearing and no hateful language. You are entitled to your opinions, but we are not obliged to listen to them.
- Do not spam chat with unrelated comments or random gibberish. This will result in a mute.
- There will be no immediate promotions unless you can be confirmed to be a previous builder. Do not ask to be promoted. Promotion comes with time.
- Griefing will result in an immediate ban and all damage will be reversed.
- Do not construct redstone mechanisms which use a clock (a pulse generator) as this will lag the server and degrade the building experience for everyone. This may be construed as griefing.
- Follow the Blueprints strictly in all areas. (Rar file here)
- Follow standard building methods in all common areas. Separate rooms not seen in the show give builders some creative license.
- Repair all hull, floor, and wall breaks exactly as they were (that is, using the same block.) You can use the middle mouse button to determine which block it was. If you cannot determine the block, get some help immediately from a capable builder. Floors, walls, and hull are completed and are not to be edited unless you find they contradict the Blueprints.
- Do not use doors of any type except in very rare cases (Ten Forward has double doors, for example.)
- You are building the ships as they were in the show. You are not personalizing it. This includes any "personal" quarters.
- Do not alter established deck layouts i.e. the "floor" of each deck. Don't change colours or move walls.
- Do not build on any project unless you have been cleared to do so by a Captain or above. This costs hours of corrective work and may result in a ban.
A note on 'Personal' Quarters: while it is nice to have a "home base" on such a large ship to retreat to after a hard day's building, the quarters you have created are not strictly yours. Any builder may edit them if they believe major improvements can be made, just as they may in any area. Additionally, personal touches to quarters must reflect the style seen within the show. For example, do not put into 'your' quarters: Borg Alcoves, dense foliage, engineering equipment, mini Holodecks, swimming pools, etc. Use your common sense and the knowledge you gleaned from watching the show when it comes to decorating quarters. Any quarters deviating from this rule will be cleared by a senior staff member upon discovery.
Conventional Building Techniques:
Most, if not all, of these techniques can be learned simply by walking through the ship and seeing what work has already been done. These techniques draw heavily from the Blueprints, Reference Photos, and Buildrules. If in doubt, ask a higher-ranked builder.
All-in-all, try to make good, visually appealing and Star Trek lore-related rooms. You may feel somewhat limited by all of these rules but that is the name of the game and part of the project's challenge! Being able to express one's creativity within the bounds of expectations is a valuable skill. We are not expressionists, impressionists, or dadaists. Think of yourself as a builder in Starfleet's shipyards; the ship and all of its equipment have already been designed and shipped - it's your job to put everything in place.
Most, if not all, of these techniques can be learned simply by walking through the ship and seeing what work has already been done. These techniques draw heavily from the Blueprints, Reference Photos, and Buildrules. If in doubt, ask a higher-ranked builder.
- Corridors (the main walkways within the ship) are made with Sand-Glowstone-Sand to look like the concentric hallways within the show. While the radial corridors are supposed to look octagonal, Minecraft's limits us to the same style for both types of corridors. All corridors within the ship are complete.
- Interior Walls (those not bordering a corridor and those within a room) are made with Sand-Jack'o'lantern-Sand. Make sure the "face" of the Jack'o'lantern is not visible by placing the block at an angle (the "face" will face you when you place it.) Jack'o'lanterns' other sides are textured the same as sand so that they may be used as a light source. If you have chosen to work on a large room, it is acceptable to divide it with interior walls as long as all the new sub-rooms are accessible in the scheme of the large room (do not create new corridor-accessible doorways unless absolutely necessary.)
- Jefferies' Tubes (the maintenance access crawlways) are made entirely of Glowstone and are 2 blocks high and 1 block wide. All Jefferies' Tubes are complete.
- Doorways are made of stone. Small doorways are 2 blocks high and 1 block wide, cut within a 3x3 stone doorframe. Large doorways may be used for certain rooms and have a 2x2 opening within a 4x3 stone doorframe.
- LCARS Computer Screens are not to be overdone. 24th Century Starfleet architecture is spartan (military and utilitarian) so do not go too crazy with the computer displays.
- Lava and Water are somewhat troublesome outside of the server. The map is updated occasionally and put up for download and for someone who does not have the appropriate mods...let's just say the most common complaint is "the ship burns down and leaks everywhere!" This is not really our concern, but if you wish to be mindful of it, contain any water you place with other blocks and surround placed lava with non-flammable blocks.
- Major Areas, including the Bridge, Ten Forward, and Main Engineering (essentially any areas that are more frequented) are NOT to be edited on-the-spot. Ask a Captain or a Lieutenant to make a copy for the area for you where you may edit to your heart's content. If your changes are appreciated by the senior staff members, the copy may be pasted back in by a someone in place of the original. Good job!
All-in-all, try to make good, visually appealing and Star Trek lore-related rooms. You may feel somewhat limited by all of these rules but that is the name of the game and part of the project's challenge! Being able to express one's creativity within the bounds of expectations is a valuable skill. We are not expressionists, impressionists, or dadaists. Think of yourself as a builder in Starfleet's shipyards; the ship and all of its equipment have already been designed and shipped - it's your job to put everything in place.
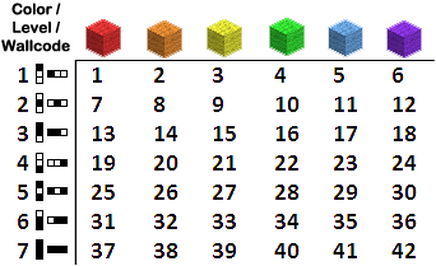
This Color-coding Schema will be discontinued in the near future to be replaced with signs inside the turbolifts denoting the deck number and a standard turbolift style doorway.
Navigating The Enterprise:
The Enterprise-D is freaking huge so we have contrived a system that will help you navigate.
The Decks:
The ship has 42 decks, connected by turboshafts, Jeffries' Tubes and sometimes spaces that span several decks. To mark the decks there is a simple colour-based system that uses arithmetic modulo-6, or in laymen's terms "once you get to six, start over again." The deck markings are found at either side of a turbolift aperture - the three blocks on either side - and are to be read from the top down. The following chart lists all the decks with their corresponding colour code.
When the six colours are exhausted, the count continues on the block below it, just as when counting and you reach "9," you restart from "0" for the next number; you just keep track of the numbers already counted by starting from "1" in the next column over.
Additionally, the compass may be used in lieu of the /thru command. Simply right-click on a wall to pass through.
The Ranking System, Promotions, & Demotions:
Server ranks roughly reflect Starfleet standard ranks with the following hierarchy, with each rank containing all the privileges of the rank below it:
Visitors:
Trekkie - Teleportation, mail, /thru, /sethome, NO build privileges.
Cadet - Same abilities as Trekkie, but you have been promoted because you have expressed a desire to help with the project. you will learn how to become and Ensign at the Academy.
Builders:
Ensign - Build privileges for the Enterprise D. You may not work on other projects unless expressly told so by those ranked Captain or above.
Junior Grade Lieutenant - Limited WorldEdit access (500 block selections, no generation; only copy and paste commands.) You may work on other projects.
Lieutenant - Full WorldEdit and BlockDoor mod access. No schematic privileges.
Lieutenant Commander - Basic Moderator Training rank. Granted access to Core Protect mod (block histories, etc.) You are also granted the authority to lead your own projects.
Commander - Ability to Promote/Demote, use WorldGuard to set up permission-only regions, and access to DropBox schematics.
Staff:
Captain (Mod) - Ability to Kick/Ban, Mute, Vanish, and change game mode for any players.
Commodore (OP) - Access to server commands, instant teleportation.
Rear Admiral - Honorary position for dedicated longtime members.
Vice Admiral - Honorary position for even more dedicated longertime members.
Admiral (Server Admin) - Position reserved for the Server Administrator
Fleet Admiral - Honorary position reserved for select project veterans. Namely, Halkun, the project founder.
Requirements for promotion:
Trekkie (dark grey) - You are a Trekkie upon joining the server.
Cadet (blue) - You have shown that you wish to contribute to the server in the future. Your eagerness has been acknowledged.
Ensign (dark blue) - You have shown initiative in the following:
Rationale for a demotion:
Server ranks roughly reflect Starfleet standard ranks with the following hierarchy, with each rank containing all the privileges of the rank below it:
Visitors:
Trekkie - Teleportation, mail, /thru, /sethome, NO build privileges.
Cadet - Same abilities as Trekkie, but you have been promoted because you have expressed a desire to help with the project. you will learn how to become and Ensign at the Academy.
Builders:
Ensign - Build privileges for the Enterprise D. You may not work on other projects unless expressly told so by those ranked Captain or above.
Junior Grade Lieutenant - Limited WorldEdit access (500 block selections, no generation; only copy and paste commands.) You may work on other projects.
Lieutenant - Full WorldEdit and BlockDoor mod access. No schematic privileges.
Lieutenant Commander - Basic Moderator Training rank. Granted access to Core Protect mod (block histories, etc.) You are also granted the authority to lead your own projects.
Commander - Ability to Promote/Demote, use WorldGuard to set up permission-only regions, and access to DropBox schematics.
Staff:
Captain (Mod) - Ability to Kick/Ban, Mute, Vanish, and change game mode for any players.
Commodore (OP) - Access to server commands, instant teleportation.
Rear Admiral - Honorary position for dedicated longtime members.
Vice Admiral - Honorary position for even more dedicated longertime members.
Admiral (Server Admin) - Position reserved for the Server Administrator
Fleet Admiral - Honorary position reserved for select project veterans. Namely, Halkun, the project founder.
Requirements for promotion:
Trekkie (dark grey) - You are a Trekkie upon joining the server.
Cadet (blue) - You have shown that you wish to contribute to the server in the future. Your eagerness has been acknowledged.
Ensign (dark blue) - You have shown initiative in the following:
- YOU MUST show the ability to conform to the conventional styles of the ship and interpret relevant reference pictures and implement them.
- YOU MUST follow the Blueprints rigidly at all times.
- YOU MUST leave all walls exactly as they are. Do not move them, to not swap blocks on them, and do not build a wall flush against them. You may erect additional walls within a room you are working on but they must conform to Star Trek style.
- YOU MUST show respect for other players of all ranks.
Rationale for a demotion:
- Breaking Server Rules will result in an immediate ban, which could be considered a demotion to below Trekkie rank. There are no known survivors.
- Ignoring warnings from Captains regarding breaches of conduct, usually regarding Build Rules, will result in a demotion to Trekkie. You have shown that you cannot contribute to the project in a meaningful manner.
- Repeated misuse of WorldEdit, if not interpreted as griefing, will result in a demotion to Ensign. Griefing will always result in a ban.
- Repeated abuse of administrative power will result in a demotion to Lieutenant.
Project History:
Relevant Videos:
Halkun:
The video that started it all. Posted September 27th, a full week before the forums were established and procedures outlined, this video found its way onto Reddit and became viral.
Halkun:
The video that started it all. Posted September 27th, a full week before the forums were established and procedures outlined, this video found its way onto Reddit and became viral.
The first update video, showing the progress of the build after two months of work, most notably the upper saucer section, Main Shuttlebay, the Bridge, and the Observation Lounge.
The second update video, showing new textures, endless corridors, more Main Shuttlebay and its force field emitters.
The last update from the project's founder, showing the Warp Nacelle exteriors and interiors as well as a hidden easter egg. Additionally, it showcases Shuttlebays 2 and 3, the Captain's Yacht, and Ten Forward. However, video embedding is disabled. Here is the link.
CerberusRCAF:
Tours as of seven-to-ten months into the project.
Tours as of seven-to-ten months into the project.
Bluegobln:
The former server host and longtime builder's promotional video.
The former server host and longtime builder's promotional video.
Deathmonkey7:
A video by one of our old builders, showcasing the Enterprise D, the early development of the Shipyards, and the now defunct Freebuild.
A video by one of our old builders, showcasing the Enterprise D, the early development of the Shipyards, and the now defunct Freebuild.
Smartguy1996:
A visually stunning video of the Enterprise D.
A visually stunning video of the Enterprise D.
Rooms List
The room code FOR THE SAUCER SECTION is built on the following syntax: (stardrive section syntax has not been finalized yet)
Floor#-HallwayRingLetter+Quadrant+Exterior/Interior-Room#(Counted clockwise from the start of the quadrant)
Some further details:
First number; Deck number. Pretty self explanatory
The hallway ring letters are labelled outwards from the centre. So the first ring is labelled A, the second ring labelled B, and so forth. And Hallways labelled starting at the end of the alphabet (eg: Z, Y, X) are straight hallways that don't belong to a ring. They are labelled aft to fore, mixing North/South and East/West hallways.
The quadrants divide the ship up into four sections, which are labelled using the minecraft "f:#" directions. To determine the quadrant, look in a cardinal direction. Press F3 and read the number on the second to last line. (f: #) This is the quadrant number. Any room between where you are currently looking and 90 degrees to the right will fall into this quadrant. Here is a picture outlining the quadrants: http://tinypic.com/r/kdu5oj/6
Exterior and Interior specifiy whether or not the room is on the exterior (towards the outside of the ship) side of the hallway, or the inside (towards the inside of the ship) side of the hallway.
The last number is the room number, counted from the start of the quadrant.
If there are any rooms attached to another, they are labelled by adding '-A' or '-B', etc. to the end of the room they are attached to.
Here's the link to the spreadsheet, in case anyone wants to sort the columns or something.
https://docs.google.com/spreadsheet/ccc?key=0AgGpEqfIs-W9dEMyQkF2RDRUZURweHk3eEI5TUZ1UVE#gid=0
If you wish to make a comment about the development of a room, please do so here: Rooms List Comment Form
